Trip / Trek to Vasota Thick Forest Near Pune and Satara

No comments :

View of koyna dam on the way of Vasota
View of Koyna Dam on the way to Vasota


View while travelling to Met-Indavali
While travelling to Met-Indavali on boat
You can get more information about Vasota here.

Details about the trek were distributed by my colleague who received it from Prasad Mane.

E-Mail message from Prasad Mane

Trek to Tiger Fort Vasota on 05 feb 2011 to 6th Feb 2011
Date: Departure on Sat 05th  feb 2011

* The Route --- Pune -Satara -Bamnoli - Met Indavali-Vasota-ambawde-Bamnoli-Pune
* Age Group: 10 years and above ( Any person with average fitness level can do this trek)
* Reporting time: Sat 05th feb 2011, 7.30 am at satara
* Dos and dont's -- No smoking & alcohol consumption (leaders have all
the rights to take the decision, incase of any misbehavior)
* Difficulty level- Moderate

Other Details:-
charges - Rs 850 /- per person

Charges Include –

1)Bamnoli to Vasota base - By Boat
2)Breakfast and Tea at Bamnoli
3)snacks in between walk
4)dinner and halt at ambawde
5)ambawde to Bamnoli - By Boat
6)Breakfast and Tea at Bamnoli
7)All service taxes and forest entry charges


Must Haves—

Good strong ruck sack,Personal prescribed medicines if any, bedding
-either sleeping bag or shawl, , torch, two liters of Water ,Cap,
Shoes, Full pants (half pants not allowed), full T-shirts , cameras on
your own responsibility

For Booking Contact

Rushikesh Joshi:-+91 9423262008
               :-+91 9503030397
Gautam Joshi: +91 9823102118

Stay

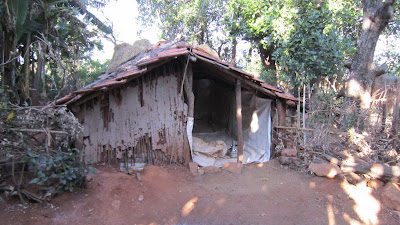
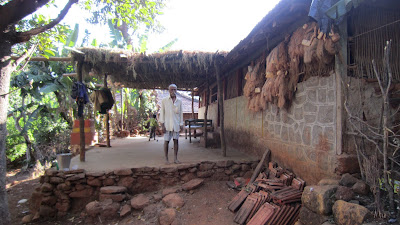
Another good experience from the trip was the stay at Ambawade - a village nearby which is connected by water route. Our stay was arranged by one of the organizer who was a resident of the same village. They give us traditional Maharashtrian food prepared in the village(very spicy).


A view of the village ambawade


view of ambawade


hut in which we slept night
Hut in which we slept during night


people who gave use shelter
People who gave us shelter

Read More

C-Coding Guidelines for making embedded systems safe

1 comment :

C-Coding Guidelines for making embedded systems safe.


C languages and its possible problems

C Programming language is widely used in the programming of Embedded software because of the specific reasons like

- Availability: For most of controllers, C is only efficient programming language available other than assembly language.

- Support for low level operations.

-Availability of optimizing compilers which produces faster, smaller and less RAM efficient codes.

- Requirement for portable code due to changing environment and market competition.

- Availability of auto code tools and open systems etc.

- Assembly language will not be suitable for critical applications since the possibility of bug getting introduced and testing efforts are very high.


Some of the problems which can be found in programs written in C language are

- Typing and careless mistakes done by programmer

- Wrong understanding of language by the programmer

- Program not compiles as programmer expects.

- Errors/Bugs in compiler

- Logical/Runtime errors in program.


So we should be very careful in wring C-programs for safety critical embedded systems.

Since C is highly matured and long been in use, lot of possible mistakes are known and also there are tools are available for the analysis of C code. So if we are coding in a constrained way keeping the guidelies collected from experienced programmers, then we can avoid most of the bugs and their by reduce the debugging efforts and  time to market.

There are standards available for the developement of C codes. Some standards are


ISO 9001/ISO 90003/TicKIT, MISRA, MIL, ANSI etc. Tools can be used for the static analysis of the code written.


Things to remember

  1. Avoid nesting of comments.
  2. Do not rely upon implementation defined behaviors. If using any implementation defined features, Then use with proper documentation and care.
  3. Keep a note on the character set and encodings supported by the compiler.
  4. Avoid using same variables names for variables in the inner scope of a block and outer scope of a block.
  5. Avoid reuse of variable names across modules.
  6. Use typedefs indicating type and signdness instead of basic types. eg:- typedef unsigned char uint8t; typedef unsigned char uint8 t; unsigned char uint8t;
  7. Use prototype declarations for functions which are visible at both the function and call.
  8. Data type of variables or functions which are declared in multiple locations should be compatible.
  9. Do not comment out code sections - Use #if, #ifdef etc. Because effect of comments inside the commented section of the code will be unexpected. eg:- Use bitfields only to keep shorter data variables to reduce the memory usage.
  10. Keep the length of signed bitfields to two or more. (Because one bit will be necessary for keeping the sign)
  11. Do not mix scope and linkages of variables. eg:- identifier name with internal linkage in one file and the same identifier name with external linkage in another file will cause confusion.
  12. Use prototypes for functions which are visible to modules containg function definition as well as function usage. (This will help in avoiding bugs caused due to function parameter mismatch)
  13. Use complete type for declaring a function name. eg:- const x = 10; should be const int x = 10; (In the first case the type is explicitly mentioned, which might cause confusion), extern x; should extern int x; (Do not relay upon the explicit type given by the compiler)
  14. Do not define objects or functions in header file. Use only declarations in header file. (Defining in header file will cause problems and confusion like multiple definitions)
  15. Restrict the scope of object or function only to the required module. (This will avoid accidental use of objects/functions by other modules).


==== Will be updated ===

Read More

Improve Android mobile battery life with a simple techneque

1 comment :

When I bought an android mobile, most irritating thing which I found was the battery life. I have tried lot of applications to increase the battery life. Most of those applictions were scheculing applications which switches on/off the power modules. There were some applications which contains a task manger also which will kill applications running in the backgound. Another technique was to underclock the mobile when it is in idle mode(needs to be a rooted phone).

Most of these cases will be somewhat difficult for someone who is not so familiar in gadgets. What I have noticed is, main reason for the battery running out of juice is due to the mobile data connection. If we are enabling and disabling the mobile data connection whenever required, then it is going to make a lot of difference(it helped me to improve battery life by around 4-6times). Disabling mobile data does not just means disabling of background data. But nobody wants to always go to the settings menu and disable or enable mobile dat frequently.

In this case we can use some simple application which provides a widget to enable and disable the mobile data. Toggle Data Widget, Data Enabler Widget are two application which I found while searching on android market which are free.

How to use ?
After installing these application,  go to the home screen and do long press. Now a menu will appear. From the menu select widget. Now another menu will popup, from this menu seleect the app name which was installed. Now it will appear in the home screen as a button. Click it to enable/disable data whenever necessary.

Another option is to add the power widget to enable/disble WiFi, GPS.

Read More

Hindi Online Internet Radio Station List with player

3 comments :

Here is my list of Hindi radio stations with embedded player and links to the stations. Select the option button to start playing the corresponding station. You can copy the link in the second column and play the staion with windows media player. Some staions will take some time to start playing depending on the connection speed. If is not playing then, the staion might be offline.


Hindi Desi Bollywoodhttp://199.16.186.36:8419
Mera Sangeet1Mera Sangeet
RadiocityPlanet radio city
Clubasia Onlinehttp://www.clubasiaonline.com/player/protected_player/nsl_wsd_ca/clubasia.asx
Radio Maskahttp://173.192.58.37:8226
radioaum2khttp://178.18.17.94:8080/
Bollywood Beatshttp://bb.1.fm/bbfm32k
Bollywood Hungamahttp://www.live365.com/play/bollywoodhungama
Radiogabbarhttp://viadj.viastreaming.net:7090
Bombay Bitshttp://www.1.fm/TuneIn/WM/energybbfm32k/Listen.aspx
Desi Music 24/7http://radio.desimusic247.net:9090
City 101FMhttp://asx.abacast.com/arabian_radio-city-24.asx
Sada Radiohttp://livesadaradio.no-ip.org:8000
Radio Mera Sangeet 64Kbpshttp://sc2.spacialnet.com:23892
Craze FMhttp://www.crazefm.com:5555/live
Apna Radiohttp://www.apnaradio.com/live/ApnaRadio.asx
Radio Teen Taalhttp://www.radioteentaal.com/masala128.asx
Radio Apni Awazmms://67.15.80.29/radioapniawaz
Frequence India1http://94.23.120.121:80
Frequence India2http://91.121.50.147:443
Frequence India3http://91.121.50.147:8080
Frequence India4http://91.121.50.147:80
Onlinefm Rentak Muzik Hiburan Terkinihttp://209.151.165.119:8368
Bollywood & Beyond - Radio NRI 24/7http://216.246.14.78:80
Romantic hindi radio songshttp://173.192.224.123:8270
Mast Radiohttp://66.96.216.215:8000
KRPI Radio 1550 AMhttp://209.51.163.227:19014
Dhol Radiohttp://213.239.198.205:8000
Suvidha Radiohttp://69.175.33.162:8292
Radio HSLhttp://174.36.206.217:8485
Desi Radio1http://66.23.234.242:8012
Desi Radio2http://67.159.39.90:8012
Desi Radio3http://64.27.2.167:8012
Hamara-Sangeethttp://213.229.93.200:8000
Hamara-Sangeethttp://213.229.93.200:9001
Priyawaaniehttp://66.90.73.200:8010
Radio Spice 105.4 FM, UAEhttp://38.96.148.13:4334
Radio Afsana Online 24/7 Radiohttp://208.186.112.40:8000
Bollywood Music Radio1http://178.239.50.57:5700
Bollywood Music Radio2http://178.239.50.57:7400
Sada Bahar Musichttp://173.192.224.123:8512
DesiZone Radiohttp://81.26.220.8:6080
Radio Mor Torhttp://94.23.145.170:8008
RADIO 2FUNhttp://67.228.101.164:7800
Chandigarh Radiohttp://173.199.133.62:8003
RMG Live stream Serverhttp://82.94.166.99:80
Radio Chilihttp://208.43.81.168:9148
BollyFMhttp://117.205.163.155:8032
RadioSANGEEThttp://99.18.109.11:8000
ARRahman Hindi Songshttp://76.73.26.114:8002
You can write comments if it is necessary to make any updations to the list of stations.

Read More

Single exe perl interpreter - perl-static.exe

1 comment :

Perl is a widely used scripting language. It is one of my favourate language, because it helps me to do lot of time consuming tasks in less than a few seconds. The regular expressions feature in perl and the shorcuts helps me to write scripts quickly. It is even possible to write script for some purpose in few minutes which might take hours or days to do with C-programming language. I uses perl for automating and processing while I do coding in embedded C.

Getting perl is very easy, we can get the package for windows, linux, mac etc from the website install. Or we can the source code from download page and compile it.

One problem with the binary packages available from perl download page is, it contains lot of modules and the perl.exe itself cannot be used to run(actual perl will be present in a dll). That is we should have the entire package to run the perl. So I thought of getting a perl interpreter which is available in a single exe.

So I got the source code for perl from the download page and found there is an option build static-perl which when compiled will give an exe file called perl-static.exe. This perl exe file can be used standalone and contains the libraries also.

You can download a copy of the perl-static which I have compiled using perl version 5.10
perl-static.zip

Screenshot of perl-static.exe version


Read More

Perl script to remove comments from C Program using regular expressions

No comments :

Many times we want to remove comments from a C-Program, may be for extracting some information from the code or some other code instrumentation. This is a handy Perl code snippet which I found from this forum.

1
 2
 3
 4
 5
 6
 7
 8
 9
10
11
12
#!/usr/bin/perl -w

$/ = undef;   # no line delimiter
$_ = <>;   # read entire file

s! ((['"]) (?: \\. | .)*? \2) | # skip quoted strings
   /\* .*? \*/ |  # delete C comments
   // [^\n\r]*   # delete C++ comments
 ! $1 || ' '   # change comments to a single space
 !xseg;    # ignore white space, treat as single line
    # evaluate result, repeat globally
print;

This script will remove both C style comments /**/ and C++ comments //. Another advantage of this script is that, it will not remove /* ... */ which comes inside the double quotes like "This is /* a */string". This is acheived with the help of conditional operations in perl regular expressions(regexp). Here regular expression is used with "e" extented switch, inorder to put comments and spaces in between the regular expression. This makes it readable.

Thanks to Lorin.

Read More

Boot swap - technique to reprogram bootloader itself

No comments :

Bootloader is a small utility program which can be added on to flash microcontrollers. It helps us to download code to the microcontroller whenever we need without using a flash programmer hardware and without taking out the chip from the target board/device.

But what if we have found some bug in the bootloader itself and want to reprogram the bootloader ?
Some options are
  1. Use a flash programmer
  2. Using ISP (for those boards having support)
But what about embedded systems in which controller is not accessable and the only option is reprogramming itself  using the bootloader ?

This is possible if
  1. Microcontroller has capability to execute code from RAM.
  2. Microcontrollerhas hardware capability to swap the boot blocks(Process called as boot swapping).
Brief note about bootloader
Layout of a simple bootloader
In a simple bootloader example shown above, bootloader is present in the region 0 to 0x1000. So this region will not be changed during reprogramming.
  1. A flash programmer/ISP etc is used to download Bootloader (or Bootloader + initial application) code to the microcontroller.
  2. Normaly bootloader passess conltorl goes to the application.
  3. Whenever there is a command to reprogram, program flow control goes to the bootloader.
  4. Bootloader starts receiving the new Application code from the remote unit using one of the communication medium(CAN, LIN, SPI, RS232, USB etc).
  5. Bootloader verifies whether the data is completely written without any errors, and finilizes the reprogramming/reflashing.
Bootloader with option for reprogramming the bootloader itself

I will explain this with the help of the microcontroller v850 series microcontroller from Renesas.
Flash Layout of v850 Series controllers - Reprogramming the entire flash Memory (Boot Swap)
v850 controller flash memory ROM has the following features
  1. Flash memory is divided in to smaller blocks, which can be individually erased as shown in the figure above.
  2. Block 0 can be swapped with Block 2 and Block 1 can be swapped with Block 3.
  3. This will help in reprogramming the entire flash memorey(including bootloader) without any risk of dumbing the chip.
Updating Bootloaders
 Now the software can be designed in two ways
A) Always the entire flash memory is reflashed.
In this cas there will not be seperate bootloader/application. So download is done in two stages. Also it is ensured that the code for downloading and the dependencies are present in the lower two bocks. Steps involved will be.
  1. Starts after receiving the command for downloading.
  2. Actual execution of the code which reprogramms will be copied to the RAM and executin will jump to the code in RAM. For this purpose, code is compiled such that it can run from any location(Position independent code - PIC).
  3. Downloads and writes the lower two blocks(0 & 1) of code in the blocks (1 & 2).
  4. Verifies whether two blocks are written without any error using CRC/checksum.
  5. Swaps blocks 0 and 1 with bocks 2 and 3. At this stage even if something goes wrong, the old code in bocks 0 and 1 can download the new code again. (Stage 1 complete)
  6. New code starts and continues downloading the rest of the code.
  7. Download is verified and finalised.
B) Simple architecture is followed, special code with bootloader(Bootswapper) will be downloaded to update the bootloader.

Updation of bootloader using bootswapper

In this case bootloader will work same as that of the simple bootloader. But if we want to update the bootlaoder, then we can download a special code (say Bootswapper). This special code will contain the code for the new boot loader which is offsetted to some other adderss. After complete download, bootloader will pass the control to the application(here the special code - bootswapper). Now this special code will execute from RAM and copy the address offseted new bootloader to the bock 2 and 3. After that it will swap the blocks to have the new bootloader in the blocks 0 and 1.

Read More

Add a torch to your robot project using White Power LED

No comments :

3Watts Power LED with 45deg Lens

Now a days white power LEDs are becoming popular, cheaper and more efficient. This makes it easier to use white LEDs as torch lights. You might have seen cheap Chinese torch lights available in the market.
Now why should we add a torch light to robot ?
Most of us have made roborts which can move, navigation enabled etc. Adding a torch light will help us to use it during night also. It is also cheap, I found the LED and lens shown in the picture for just INR105(around $2.5).
Lens and LED kept seperately

How to add ?
  1.  Selecting the power LED. There are power LEDs available with various power ratings. Common ones are 1W, 3W and 5W. Here main thing to consider will be more the power rating, more brighter the LED will but less will be the battery life. Choose one with a metal base, because power LEDs draws lot of current compaired to ordinary LEDs which makes it very hot. Metal base helps the LED to dissipate the heat fast.
  2. Choose the lens depend on the requirement. In the local market, I have seen Lens varying from 40deg to 75deg. Here lower the angle of lens narrower will be the beam of light.
  3. Driver circuit: This is the most important part. Driver circuit has to designed considering the power consumption(more power consumption = less battery life), whether you want control the brightness using PWM, life of the LED, price of the components used in the driver circuit etc. Driver ICs are also available(ZD850 is one which I found on internet)
We can find a lot of circuits if we serarch on google. I have listed below some of the circuits which I found useful.

  1. Microchip has article Buck Configuration High-Power LED Driver, which is based on based on a buck topology switching power supply using the on-chip comparator peripheral within the PIC12F675 microcontroller.
  2.  A very simple circuit using regulator IC LM317.
  3. Another circuit by dan.
You can search on Google for more information.


Read More

Read Tamil webpages on mobile phone using Opera Mini

6 comments :

In this post I will show how to do settings for Opera Mini browser so that, Tamil web pages can be viewed using a mobile phone. This method will work for all mobile phones with java support. But before starting, if you are using android mobile, then there is a browser availabe from Mr. Dhanika which can render unicode tamil and simhala languages. This setting for Opera Mini is same as my previous post. But here I have added some of the screen shots related to viewing tamil pages.

Before starting, this is how a tamil unicode page looks, if you are trying to open a Tamil page without doing the setting.
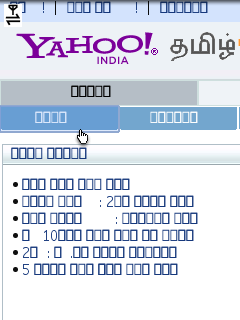
Yahoo Tamil page - Before setting

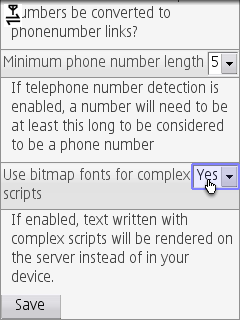
First step is to type the address bar "about:config" and press go.
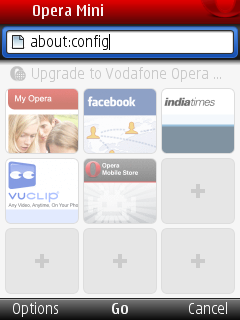
Opera Mini - Address to open configuration page
Now this will show a menu called "Power-User Settings" where some settings related to loading of pages will be shown, from this menu we have to change the setting "Use bitmap fonts for complex scripts". Default selection for this setting will be No. Inorder to read Tamil pages, change this setting to Yes.
Change setting to Yes

Now click save and go back to the Opera Mini home to open any tamil page and see.

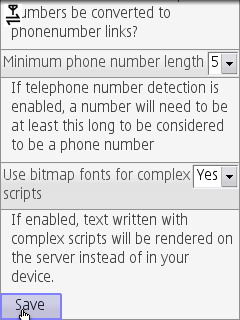
Click Save button to save the settings
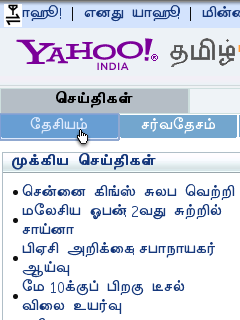
Yahoo Tamil Page - After setting
Note: Enabling this option will result in higher data rate. For example, yahoo tamil site size is 129KB with setting and it was only 32KB before enabling the setting. If you are upgrading Opera mini to a higher version, then this setting has to be done again.

Read More

Walk-In Test at Cisco

No comments :

Last saturday, I went for a Walk In for experienced professionals at CISCO, Marathahlli, Bangalore. Call was for Embedded C/RTOS professionals having experience of 3 to 7 years. They asked us to wait for some more people to come, and then called for the test.
Test was for 1hour and there was around 10 questions. All questions were C-programs/C snippets which contains one or two logical errors. We were instructed to mark the error on the same sheet and describe the mistake.
Programms were based on data structures, string handling, arrays, dynamic memmory allocation etc which includes lot of pointer operations, function call and return. There was one program based on unix function calls like open, read, write which I was not familiar.
They told us that, I we are short listed, then they will be informing in one week, because the openings are in Chennai location. So the paper will be sent to Chennai location where it will be evaluated.
Now awaiting resopnse..

Update
On May 5th 2011 I got a call from CISCO asking me to attend the interview... thet send my this e-mail

Hello,
Thanks for showing interests in pursuing job opportunities with Cisco Systems in Chennai.  
We would like to meet you for a person discussion and the details for the meeting are given below:
Date                            07th May 2011
Time                            12.30 PM
Venue                          Cisco Systems ( India ) Private Limited
Divyasree Chambers 
B Wing 
O'Shaugnessy Road 
Akkithimanahalli 
Bangalore - 560027 
Karnataka 
India 
Phone: +91 80 4103 3000
Land Mark                     Shantinagar and Behind Hockey Stadium.  
Contact Person            
Contact No.                       
Plz get your updated resumes along and If you have appeared for Interview within 6 months, pls ignore this mail
Please acknowledge this mail as your confirmation.

Job Description
Job Description
                             

·         Strong Programming fundamentals
·         - Strong Analytical and Logical skills
·         - Strong C programming skills
·         - Strong software debugging skills
·         - Experience on multi-threading embedded systems
·         - Strong RTOS and/or Linux concepts
·         - Software High level Design experience and skills
·         - Should have worked on large scale projects
·         - Experience working on video technologies OR embedded set top boxes
·         - Can understand architectures and define designs
·         - Strong communication skills
·         - Desire to Learn

Yesterday(7 May 2011), I attented the interview.. It was a 1:1 interview. They asked about my previous experience, but when I started explaining they showed lack of interest, since my experience was on automotive embedded domain. Then I was told to write two C-programs.
1) To print a two dimensional array(square matrix) in the diagonaly
2) To print the contents of a simple linked list in the reverse order (without using multiple traversal and memory )

I was not able to write the answer to the second question as I was not so familier with data structures, I wrote program to reverse the linked list. I was told to leave after that..

I dont have much hope that they might call.. but still awaiting for a response.

Read More

MINI ARM7 KIT - ARM developement board Review

1 comment :

MINI ARM7 KIT - LPC 2148
I was trying to start working with ARM microcontroller for long time. I thought it will be better to buy one developement borad to start. Since it is only for hobby purpose, I did not want to invest much on the developement board, so I started searching for a cheap ARM developement board.
First I searched in the local electronic markets in Pune, but I was able to find only two shops in Pune where there boards are available (Rajiv electronics and Sadashiv electronics). I enquired in these shops, but I was not able to find any boards which were cheaper than INR ₹2500(around $57) and I did not feel it is worth buying those boards. So I deced to get MINI ARM7 KIT - LPC 2148 from NSK electronics, Bangalore which is available for INR ₹1500 online. There is option for buying online, but I bought it directly from their shop when I visited Bangalore last week.

Review
The kit consists of the following items
  1. Development Board (Mother board and LPC2148 attached on daughter board)
  2. Rs232 Port Cable
  3. CD containing Phuilips Flash Utility, Data sheets, Example Porograms from Keil, and Keil3 Evalution
  4. 20 Burg Connecter wires
  5. USB Port Cable
There is no seperate power supply, but the USB cable can be used as power supply.
Board contains
  1. Detatchable daughter boards with 12MHz crystal and burg pins for accessing ports
  2. Two serial port connectors 
  3. Four LEDs for testing
  4. Three push button switches
  5. Option to add/solder ICs for CAN(CAN transceivers are not included in kit)
  6. USB Host port etc
Setting up the board was very easy, Connect the serial port to computer, install and open the Philips Flash Utility(download v2.2.3 here), and set the options as shown in screenshot below.

Even though the quality of the board is not up to the mark(one out of four LEDs did not work when I tried the LED blink code), this will be a cheap and good option to start with.

Read More

Construct your own MMC/SD card adapter for microcontroller interfacing

No comments :

Once I was trying to interface my old microSD card with an Atmel Atmega8 controller. First I thought of using a SD/MMC card adapter and solder the wires to the adapter. But I felt like I will not be able use the adapter for some other purpose and I will have to solder the wires again, if I want to interface another SD card. So I decided to get a SD card socket which can be attached to my circuit.But I found it difficult to get the socket in the local market, and those available in the online markets were very costly. So I constructed my own SD card socket/adapter for my circuit.

These are the items which I have used for construction.
  1. Pieces of general purpose boards
  2. Pieces of plastic
  3. Pins taken from the IC socket (Used as contacts)
  4. Glue
  5. Burg stick
Shown below are pics of what I have made
Adapter with SD card inserteed


Read More