Open file dialog exe for vbScript

1 comment :

I searched a lot in google to find a good method to show a file open dialog using vbScript. Eventhough there was some method already available, those were have limitations which makes the method not useful in many cases.
So I created this exe which will take some information as command line parameter and writes the file name to iostream. This information can be now read using the script and be used.

Example for Open File
 1
 2
 3
 4
 5
 6
 7
 8
 9
10
11
12
13
14
15
16
17
18
19
20
21
22
Dim objWshShell, objExec
Dim strExecCmd
Dim tmp

strExecCmd = """" & strScriptPath & "OpnFile.exe"""
strExecCmd = strExecCmd & " ""1""""Hex File (*.hex)""""*.hex""""Hex""""Open Hex File"""


Set objWshShell = CreateObject("WScript.Shell")
Set objExec = objWshShell.Exec(strExecCmd)

Do While objExec.Status = 0
     WScript.Sleep 100
Loop

If objExec.ExitCode = 0 Then
    tmp = Split(objExec.StdOut.ReadLine(), "~")
    strHexFile = tmp(0)
    MsgBox "Save file " & strHexFile
Else
    WScript.Quit
End If 

Example for Save File
 1
 2
 3
 4
 5
 6
 7
 8
 9
10
11
12
13
14
15
16
17
18
19
20
21
22
Dim objWshShell, objExec
Dim strExecCmd
Dim tmp

strExecCmd = """" & strScriptPath & "OpnFile.exe"""
strExecCmd = strExecCmd & " ""0""""Hex File (*.hex)""""*.hex""""Hex""""Save Hex File"""


Set objWshShell = CreateObject("WScript.Shell")
Set objExec = objWshShell.Exec(strExecCmd)

Do While objExec.Status = 0
     WScript.Sleep 100
Loop

If objExec.ExitCode = 0 Then
    tmp = Split(objExec.StdOut.ReadLine(), "~")
    strHexFile = tmp(0)
    MsgBox "Save file " & strHexFile
Else
    WScript.Quit
End If 


Screenshots


You can download the example scripts here. I have also published a post about another script which uses this technique.

Read More

vbscript for detecting usb serial com port number (can be used with avrdude for programming avr)

1 comment :

I was using the adruino bootloader on a ATmega32 and for uploading the new firmware is done using avrdude. Initially I was using a windows batch file to upload the content. Since the development board contains an FTDI chip for USB to serial conversion(same in arduino boards), the driver will assign different com port number for  different PC/board combination for which it was necessary to update the com port number manually. So I thought of writing a vbscript to automatically detect the correct com port and run the avrdude.
I started searching in google for the help. There was scripts to list the serial ports(Win32_SerialPort), but that does not list the USB serial devices. Then I found that using wmi services it is possible to parse through the Plug and Play(PnP) devices in windows(Win32_PnPEntity). Another thing I found is the name string for each device will contain the comport number also.

PnP device information for the FTDI chip in my development board
Class GUID: {4D36E978-E325-11CE-BFC1-08002BE10318} 
Description: USB Serial Port 
Device ID: FTDIBUS\VID_0403+PID_6001+A700DZAFA\0000
Manufacturer: FTDI 
Name: USB Serial Port (COM4) 
PNP Device ID: FTDIBUS\VID_0403+PID_6001+A700DZAFA\0000
Service: FTSER2K 

Same name string is also showed as the name of the device if we open the windows device manager.
The  script I have listed below will use the Name string to find the com port and then uses it.

' +----------------------------------------------------------------------------+
' |                                 Arun                                       |
' |                           frmkla@gmail.com                                 |
' |                     http://collectns.blogspot.com                          |
' |----------------------------------------------------------------------------|
' |            Copyright (c) 1998-2011 Arun. All rights reserved.              |
' +----------------------------------------------------------------------------+

Option Explicit

Const BAUDRATE = "19200" 'Set "" if baud rate setting is not necessary
Const AVR_PARTNO = "m32"

Dim strPortName' As String
Dim objArgs
Dim strHexFile
Dim strScriptPath
    
strScriptPath = Replace(WScript.ScriptFullName, WScript.ScriptName, "") 

Set objArgs = WScript.Arguments

strPortName = GetComPort

If strPortName = "" Then
    MsgBox "Cannot find the USB COM Port" & vbCrLf & "Please verify the USB conncetion"
Else
    If objArgs.Count <> 1 Then
        'MsgBox "Usage " & WScript.ScriptName &" <Hex File>"
        Dim objWshShell, objExec
        Dim strExecCmd
        Dim tmp
        
        strExecCmd = """" & strScriptPath & "OpnFile.exe"""
        strExecCmd = strExecCmd & " ""1""""Hex File (*.hex)""""*.hex""""Hex""""Open Hex File"""
        

        Set objWshShell = CreateObject("WScript.Shell")
        Set objExec = objWshShell.Exec(strExecCmd)

        Do While objExec.Status = 0
             WScript.Sleep 100
        Loop

        If objExec.ExitCode = 0 Then
            tmp = Split(objExec.StdOut.ReadLine(), "~")
            strHexFile = tmp(0)
        Else
            WScript.Quit
        End If 
    Else
        strHexFile = objArgs.Item(0)
    End If
    
    Dim oShell
    Dim strRunCMD
    

    'Generate command string
    strRunCMD = """" & strScriptPath & "avrdude"" "
    strRunCMD = strRunCMD & "-C " & """" & strScriptPath & "avrdude.conf"" "
    strRunCMD = strRunCMD & "-p" & AVR_PARTNO & " -cstk500v1 -P\\.\" & strPortName
    If (BAUDRATE <> "") Then strRunCMD = strRunCMD & " -b" & BAUDRATE
    strRunCMD = strRunCMD & " -D -Uflash:w:""" & strHexFile & """:i"

    'Execute the upload command
    Set oShell = WScript.CreateObject ("WScript.Shell")
    oShell.run strRunCMD
    'Wscript.Echo strRunCMD
    Set oShell = Nothing
End If

'
Function GetComPort()
    Dim strComputer
    Dim objWMIService
    Dim colItems
    Dim objItem
    Dim objRgx 'As RegExp
    Dim objRegMatches 'As MatchCollection
    Dim strDevName
    

    GetComPort = ""
    
    strComputer = "."
    Set objWMIService = GetObject( _
        "winmgmts:\\" & strComputer & "\root\cimv2")
    Set colItems = objWMIService.ExecQuery _
        ("Select * from Win32_PnPEntity")
    For Each objItem In colItems
        If ("FTSER2K" = objItem.Service) And ("FTDI" = objItem.Manufacturer) Then
             
            set objRgx = CreateObject("vbScript.RegExp")
            

            strDevName = objItem.Name
            objRgx.Pattern = "COM[0-9]+"
            Set objRegMatches = objRgx.Execute(strDevName)
            If objRegMatches.Count = 1 Then
                GetComPort = objRegMatches.Item(0).Value
            Else
            End If
        End If
    Next
End Function

In the script listed above, the function GetComPort returns retruns the comport number if the port is detected, else it will return empty string "". This script also uses an exe file OpenFile.exe to show the open file dialog box.

Click here to download a copy of the script with avrdude and other support files.

Read More

Center Justification for C - printf

No comments :

I was working on a project usig an avr controller and glcd for showning the user options menu. For the menu entries we were using sprintf function to create a string and then passing it to the glcd library functions. Inorder to align the printed text, I searched for the justification options availale with printf/sprintf functions.
After a lot of searching, I found that only left justification and right justification supported, so we have to use some tecniques or custom functions to align the text. Finally from a forum, I got a smart piece of code.


 1
 2
 3
 4
 5
 6
 7
 8
 9
10
void f(char *s) 
{ 
        printf("---%*s%*s---\n",10+strlen(s)/2,s,10-strlen(s)/2,""); 
} 
int main(int argc, char **argv) 
{ 
        f("uno"); 
        f("quattro"); 
        return 0; 
}

Read More

Portable WinAVR - Compile AVR code on PC where WinAVR is not installed

No comments :

from chip45

While searching a bootloader for my project board with atmega32, I have found lot of bootloader projects. But all those were projects/makefile made to compile with WinAVR or IAR. Since there was only Codevision avr available at my work PC, I was not able to install WinAVR. So I started searching for a method to compile the project without WinAVR istallation.
After searching lot I found that there is a portable version of WinAVR available here. It was described in WinAVR project page as written below.
You can try WinAVRTM out with Portable WinAVRTM, a version that doesn't require an install. And when you get hooked on WinAVRTM, you can put Portable WinAVRTM on a USB key and take it everywhere with you! School, work, the library, the dentist, and more!
 This portable version is available for download from chip45. Here I have uploaded my copy which I have donwloaded, in case it is not available at any time. But before uisng it we need to go through the quick start guide, because the folders and batch file to invoke the command line needs to be placed in the root and some files need to be edited.

Read More

Button Magnet search in Chennai, India

1 comment :

The toy shop from which I bought the magnet
Button magnet is very convenient when we want to attach our circuit boards or any not so heavy boxes to some metal surfaces.
I was working on a project in which a PCB containing coil tracks has to be attached to the rotor disk of a motor inorder to test the inducive sensor used for measureing the speed or the rotor. We have designed the PCB such that the it can be attached to rotor disk using a magnet.
But there was a problem, we dont have a suitable magnet. Lot of vendors are available online, but they will take some time for the order to be delivered. So I went searhing in the hardware shops around Kanthaswamy temple, near pookkada, parrys market for a button magnet. In the hardware shops only black ferrite magnets were available. After searching a lot i got the shining neyodymium magnet from a toy distributor shop. There was only one type available(10mm dia x 1mm thickness) and it was perfect for our requirement.


Read More

Beyond Compare Portable Version

No comments :

Beyond Compare and options

Beyond compare is one of my favourate diff tool. It has lot of options like
  • compare folders
  • comparison with code syntax highlighting
  • edit and merge available from the diff viewer
  • options to choose what to compare(while compare two c source code files, we can ignore difference in comments)
  • binary comparison, etc etc
these are a few features out of hundreds..
Recently I was trying to get a portable version of beyond compare from internet. But later I relaised that the installer itself provides an option for portable installation. Even the lisence will be available in the portable copy.
Beyond Compare Portable Install
Here I have uploaded my copy of Beyond Compare Portable installation.

Read More

Portable C/C++ Compiler with portable msys

No comments :


It will be handy to have a C compiler which is ready to be used without installing.Mingw is the windows version of the open source gcc compiler suite. It can be used to compile both C and C++. It is possible to use the Mingw from one pc to another by copying the C:\Mingw folder, but there is some problem regarding the folder path settings and update functionality.
Portable mingw from portableapps.com is a portable version of mingw compiler which contains batch scripts to invoke the commandline with the environment variables set and also has an update batch script. Previous versions of this package even has the msys environment.
Here I have uploaded my copy of Mingw Portable installation. In which the larger file is an older version, but contains msys.

Read More

Guruvayoor - To see lord guruvayoorappan

No comments :

Guruvayoor temple(about 23km from thrissur - the cultural capital of kerala) is one of the places I always wants to visit. This is a sacred place in kerala where we can feel the presence of lord Krishna(guruvayoorappan). This is my third visit to guruvayoor. This time I am alone. Main reason for my visit is to attend my friend's marriage at thriprayar, a place near guruvayoor. My last visit was with him. The moment he informed about his marriage, I decided that I all be attenting his marriage and will visit guruvayoor.

Read More

C Code to find endianness (little endian or big endian)

1 comment :

Endianness tells how multiple byte variables are stored in the RAM or handled in a particular format. In normal cases, endianness will be transparent to the user. That means the programmer do not need to worry about how the variables are handled. Every thing happens at the hardware of the processor or will be managed by the compiler.
But if we are trying to access the value of variable directly from the memory, then there is a problem. For this we should know in what order individual bytes in the variable are kept in memory.

Example Code
1
 2
 3
 4
 5
 6
 7
 8
 9
10
#include <stdio.h>

int main()
{
    unsigned short int Var1 = 0xAA55;
    unsigned char *p = (unsigned char *)&Var1;
    
    printf("Lower byte = 0x%02X\n", *p);
    printf("Higher byte = 0x%02X\n", *(p+1));
}


In the source code,Var1 is a 2-bytes variable which contains 0xAA55. Now  p is declared as pointer to an unsigned character of size 1-byte. Since p is initialized to the address of the variable Var1, it is now pointing to the first memory location which contains Var1. For example(see the figures shown below), if variable Var1 is in the address 0x1035 then it will be occupying the addresses 0x1035 and 0x1036. Depending on the endianness the order in which higher byte and lower bytes are stored in these memory locations. By printing *p we will know what is there in the first address ie, 0x1035 and by printing *(p + 1) we will know what is there in the second memory location.
Memory map in case of Little Endian Architecture

Memory map in case of Big Endian Architecture
Output
Pasted below is the output of the program compiled and executed on my netbook running on Intel atom processor.
G:\Working\c_programs>gcc EndiannessCheck.c

G:\Working\c_programs>a.exe
Lower byte = 0x55
Higher byte = 0xAA

G:\Working\c_programs>

Here you can see that first byte printed using the pointer p is 0x55 and second byte is 0xAA. Since lower byte lies in the lower address it is Little endian architecture.

Read More

Ameya-yokocho Market (Ameyoko), Ueno-Okachimachi, Tokyo, Japan

No comments :

Ameya-yokocho Market[Ameyoko] is a very busy market in Ueno-Okachimachi. Here you can find any thing for shopping. Some of the items are Jewels, Precious Stones, Gems, Perls, Fashion items, Leather products, Clothes, Spices, Cereals, Green tea, Fish/Sea food, restaurants, food stalls etc etc the list goes on.

These are some pictures which I took during my visit to this market on 10th October 2010.


These are some other webpages about this market

Ameya Yokocho or briefly known as Ameyoko is a bustle market street paralleling Yamanote Line tracks between Okachimachi and Ueno Station. Shops, restaurants, outdoor food stalls or what the local called as 'Yatai' are practically operating from sunrise till dark takes over under a stretch of concrete train tracks.


Ameyko Market from happyjappy.com
This is one of the best Asian Bazaars, here you will find a little bit of everything, and much of it at bargain basement prices, once a black market, it has become one of Tokyo’s most vibrant places with a huge array of food, clothing, jewellery, toys and cosmetics. you can buy anything from the latest pair of jeans to seaweed or pickled octopus tentacles.

Tokyo Travel: Ameyko from japan-guide.com
Ameyoko is a busy market street along the Yamanote line tracks between Okachimachi and Ueno Station, the site of a black market after World War Two.
 
Ueno Okachimachi from Tokyo-Tokyo.com
 Ameyoko, located in the area between Ueno and Okachimachi, is a busy bazaar-style market. It has hundreds of stalls for about 400 meters alongside and under the elevated track that runs between JR Okachimachi Station and JR Ueno Station. Ameyoko is famous for its unique atmosphere - jam packed stores, buyers bargaining and negotiating with the sellers, and vendors out-shouting each other at the top of their lungs to attract buyers.

Okachimachi is the biggest and most famous permanent open-air market in Tokyo(pics). From Louis Vuitton bags and Gucci belts to Yakitori meals on the street, anything can be found.


Some videos found on youtube and other sites

Ameyoko Market in Tokyo


Ameyoko Market


Ameya Yokocho: An Amazing Shopping District in Tokyo!

JAPAN TRIP - Let's walk Tokyo, Ameya Yokocho of Ueno together 

Tokyo Ameyoko Ueno Best Market in Town  


Read More

Repartioning dell Notebook hard disk

No comments :

I have a Dell Inspiron Mini 10 Netbook which I bought for reading and surfing internet while I am travelling. When I started using my new netbook, I felt difficult to organise my files because there is only one partition aveilable for use. So I decided to partition the hard disk.
First I checked the windows disk mangager which comes with windows 7 to partition the hard disk. But it has lot of limitations and it creates primary partitions. So only a maximum of four partitions can be made(maximum possible primary partitions which can be created is four). Out of this four three are already in use, because dell has a hidden recovery partition and a windows 7 boot partition. This limits us to create only one more new partition, also the size of the new partition has limitations.
After searching, I found the application gparted. Gparted provides a bootable iso image which can be used to boot from CD or USB flash drive. After booting from the image file downloaded, we will be able to edit the partition. So the C drive can be shrinked to generate free space and we can create any number of logical partition by creating a new extented partition.
Steps will be
  1. Download bootable iso from the gparted download page.
  2. Write it to a CD or use unetbootin to make a bootable USB from the image(Click here to donwload).
  3. Defragment the os partition, so that free space is available. (This will make resizeing faster and minimize risk of data loss)
  4. Boot from the Gparted live boot CD/USB disk
  5. After booting gparted will be available at the desktop(It starts up automatically at time of booting).
  6. Now resize the os partition.
  7. Create an extented partition in the free space created by resizeing.
  8. Create logical partitions as required.
  9. When everything is done, Click apply button to write changes to the disk.
Note: If you are following these steps, then take a backup of your data before proceeding. And do at your own risk.
    Screenshotes

    Creating Gparted USB Using Unetbootin

    Following screenshots are taken with Gparted live boot CD running from a Qemu virtual machine.

    Gparted live CD - Boot Screen


    Gparted live cd - Desktop

    Gpared - Resize ntfs os partition
    Gparted - Create new Exetented partion

    Gparted - Creating logical partitions
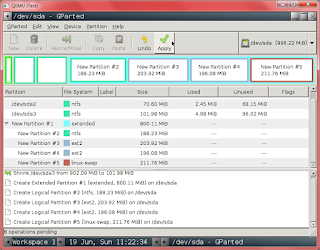
    Gparted - After creating the partitions, Click Apply

    Gparted - Writing changes to the disk

    Read More

    Tarakeshwar temple, Yerwada, Pune

    No comments :

    Tarakeshwar temple is an old temple in Yerwada, Pune where Lord Shiva is the main god. This temple is situated at the top of a small hill near Yerwada bridge.


    Some pictures of the temple

    Temple gate near main road
    Path to the temple

    Temple entrance

    Tarakeshwar Temple

    Read More

    View of Pune city near tarakeshwar temple, yerwada

    No comments :

    Photos taken on 13th May 2011


    Busy traffic on old yerwada bridge and new bridge under construction


    Photo taken on 19th June 2011
    Yerwada bridge - Old and new one under construction


    Read More

    Recovering data from hard disk with corrupted partition table

    2 comments :

    Last weekend I accidently overwritten the partition table of my dell inspiron mini 10 while trying to install the grub4dos mbr.
    I was trying to dual boot windows 7(default OS which came with the Netbook) and windows xp operating systems. Since Windows XP was installed after Windows 7, my netbook was not able to log in to windows 7. I did some experiments like using easyBCD, windows 7 recovery from USB drive etc to boot windows 7. But it did not work.
    After doing some research with the help of different tools, I found that problem is due to having different primary partitions. While booting, bios will check for a partition with boot flag set and loads the boot code from that partition. When windows XP is installed, it updated the boot flag such that partition with windows XP is bootable. So the recovery tools were updating the windows 7 boot partition, but the boot flag was set for the XP partition. So only Windows XP was booting.
    While I was trying different tools, I have erased the boot partition of Windows 7. So I decided to install grub4dos with its files on the boot partition.
    My plan was to create a bootable USB disk using and then install grub4dos from the commandline interface of grub boot menu displayed by the.
    But unknowingly I typed
    dd if=(fd0)/grldr.mbr of=(hd0)     => Wrong method 
    

    Instead of doing the steps 
    dd if=(fd0)/grldr.mbr of=(sd0) bs=440 count=1
    dd if=(fd0)/grldr.mbr of=(sd0) skip=1 seek=1
    
    which will leave the partition inforamtion and write only the mbr. 
    Partition Layout - Before writing mbr wrongly
    Partition Layout - After writing mbr wrongly


    Because of the wrong command, partition table is overwritten by grldr.mbr. When I rebooted, grub4dos was giving error that it cannot find the grldr because of the corroupted partition table. While trying commands root (hd0,0) grub reported that the partitions cannot be found. When I checked with the gparted live boot CD, it reported hard disk to be empty.
    Eventhough the partition table is erased, data contained in the disk is available. Fortunately I had a multiboot CD containing Bart PE. With getdataback NTFS software, I was able to recover the data from hard disk.
    Steps involved are
    1. Booting the Bart PE CD from external CD drive(Can be done from a USB flash drive also). While booting, also connect an external disk drive big enough to hold the recovered data.
    2. Scanning the hard disk using the getdataback NTFS(or FAT depending on the partition types).
    3. Getdataback software will list the possible partitions after the scanning.
    4. Save the scan data at this stage so that it can be loaded again for restoring another partition. This will help saving the time need for scanning the disk agiain.
    5. Select the correct partition from the list. Correct one can be identified by checking of size of the partition.
    6. Copy data to the external disk drive.
    7. Repeat the steps for another parititions. 
    Screenshots of using getdataback


    Read More