Construct your own cheap avr icsp programmer with usb power supply
In this post I will explain how I have constructed an AVR circuit with ISP programmer for ATMEL Atmega8 which requires a minimum of only four resistors (if status LEDs are not required), power supply and oscillator circuit.This method will be applicable for other ther AVR microcontrollers also. In this method we need only five lines for programming. This method is called as ISP or ICSP (In Circuit Serial Programming) four plus one line for ground is used. The four lines are used for
Now if we want we can add additional lines for status LEDs like busy, porgramming, ready, vreifying etc.
What makes this programmer so simple is the ISP featre of the AVR microcontroller and software used for programming. AVRDUDE is the most popular programmer software available. It supports lots of programmer hardwares available in the market. But the main advantage is that, we can can define a programmer in its configuration file. So if we connect wires differently also, we can create the programmer definition with the connection which we have done. This makes it easy to add status LEDs.
Circuit
You can find in the page "Make your own, ultra simple, universal AVR programmer !!" an example connection to start with, but in that example, PonyProg2000 is used with the programmer selection “Avr isp i/o”. But I prefer AVRDUDE because we can configure the connections. You can visit this page for example on how to use AVRDUDE with windows or linux. While wiring you can add an LEDs with transistor switches(if necessary) for the status LEDs.Programmer cicuit from example page
Now inorder to configure the programmer for avrdude, open file avrdude.conf. In the header of the file, there will be format for how to define a programmer, which has lot of parameters, but we can define a simple programmer as below
1
 2
 3
 4
 5
 6
 7
 8
 9
10
11
12
13
programmer
  id     = "ANameForProgrammer";
  desc   = "Description about programmer";
  type   = par;
  vcc    = 2, 3, 4, 5;
  reset  = 7;
  sck    = 8;
  mosi   = 9;
  miso   = 10;
  errled = 1;
  rdyled = 14;
  pgmled = 16;
  vfyled = 17;
Here it is simple to understand, eg:- mosi is connected to 10th pin of parallel port and so on. Dont forget to update the fields according to the connection you have made. vcc=2,3,4,5 mentions that programmer uses those pins for powering the programmer circuit. But this will not be necessary if we are giving external power supply.
Power supply
One simple method for powersupply is to use the vcc option of the AVRDUDE mentioned above and and use the parallel port to power. This will be the cheapest option.
But I was working with a circuit wich was already powered. There is a project called as V-USB formally called as AVR-USB. This project is about adding USB support on AVR chips using firmware. In this page we can find a circuit diagram(also shown below) on how to connect the USB port to AVR.
This circuit will be applicable for other AVRs also visit V-USB website for more details.
Connection of AVR to USB port
Final board
Board with ISPand status LED connection
Tamil online internet radio player list
You can write comments if it is necessary to make any updations to the list of stations.
Costruct your own very cheap laptop cooler stand from recycled materials
But last month my desktop had a complaint and because of which I started using netbook for longer duration. Then I discovered that it is getting hotter when I am using it for longer duration.
So I dedided to buy a laptop cooler stand. Then I thought why cant I construct one instead of buying from market ? So I have collected some materials and constructed a cooler stand.
Here is a list of things I have used.
Now construction is very simple
Now plug the charger and start using the laptop cooler stand.
Note: There is a risk of motor/mobile charger to burn out if the power ratings of the motor and charger does not matches. Try it at your own risk.
These the picture of the laptop cooler stand which I have made.
Open links on blog in a new window
But the problem here is, link will be opening in the same browser. So the person who is reading the post will not be able to continue reading the post and they will be directed to page where the link is pointing to.
This can be avoided by modifing the HTML tags for adding the link so that the page will be opened in a new window instead of the current window. Now the reader can continue reading the post.
Steps to do this in blogger
1) Add the link as it is normally done.
2) Go to the "Edit HTML" tab of the blog post editor.
3) Search and find the text/keyword for which you have added the link. Which will be in the following form.
eg:- Text with hyperlink
1
<a href="http://linkedtext.com/">Text with hyperlink</a>
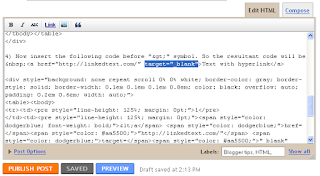
4) Now insert the following code before ">" symbol. So the resultant code will be
Text with hyperlink
1
<a href="http://linkedtext.com/" target="_blank">Text with hyperlink</a>
Screenshot
"Edit HTML" view with modified part highlighted
Further reading : Manging window
Convert HTML code to use with blogger template
Many times we might want to add some HTML code for adding boxes, lists or some logic using javascript in our blog. Doing so within a blog post is somewhat easy. Because we just have to paste the code in the "Edit HTML" view of the blog post editor. But how can we add it to the template, so that it will be available in all the posts ?
Here just pasting the code will not work most of the time.
Templates are XML format files in which different entities of the blog post are represented by special keyword. For example, post.body represents the content of the post and post.title represents the title of the post. So in the XML file using these keywords and html tags, the appearance of the blog will be defined.
Simple. Just replace the special characters with keywords.
Note: No Spaces before ";"
example code before converting
1
2
3
4
5
6
7
8
<table border="0" style="width: 176px;"><tbody>
<tr> <td colspan="2" width="168">Select your T-Shirt size</td>   </tr>
<tr>     <td width="119">Small</td>     <td width="49"><input type="radio" /></td>   </tr>
<tr>     <td width="119">Medium</td>     <td width="49"><input checked="true" type="radio" /></td>   </tr>
<tr>     <td width="119">Large</td>     <td width="49"><input type="radio" /></td>   </tr>
<tr>     <td width="119">X-Large</td>     <td width="49"><input type="radio" /></td>   </tr>
</tbody></table>
</div>
For java scripts, if you do not want to use any blogger specific keywords in the javascript code, then it can be pasted by adding a "< ! [ CDATA [" before script tag and "] ] >" the end of script tag(Without spaces).
Code Converter
Add/Embed Code snippet box on blog with syntax highlighting
After a lot of search on google, I found this web page Source code beautifier / syntax highlighter. In this page we can give our code snippet as input and select the code language and then submit. Now in the other box we will get the html code for the formatted code snippet which can be pasted directly on the html view of the blog post.
Screenshot of the tool
Malayalam online internet radio player
Since long time I am listening to malayalam radio stations online, mainly because I am not living in Kerala now and this is the only and convenient wat to listen. Previously only few stations like RadioDumDum, RadioJoyAlukkas etc were there. But now the list of malayalm online radio stations has increased from a few to more than a dozen.
This has also made it difficult for me to keep track of all the stations, mostly online radio stations comes with their own softwares. In my previous post on Malayalam internet Radio I have mentiond the direct links to some of the stations. In this post I have listed the internet stations which you can select and the embeded player will start playing the corresponding station.
You can select the station to be played from the list given below.
NOTE:- Some stations will be offline. So even if you select a station, it will not be played if it is offline. Also the internet connection speed should be good enough to continously stream the stations.
Enhance digital images

Original image and enhanced image

Original image and enhanced image
Read Malayalam(or other complex script languages) on mobile using Opera Mini
After searching a lot I found a technique in which we can enable a feature in Opera Mini browser which is available even for low end mobile phones with java/J2ME/MIDP support. This will work for almost all language which has unicode character maps available. eg:- Indian languages Malayalam, Hindi, Kannada, Telugu, Punjabi, Gujarati, Bengali etc.
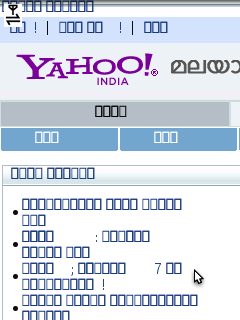
Opera Mini - Yahoo Malayalam page before changing the setting
Inorder to read, we have to enable a special menu on the Opera Mini browser by typing "about:config" in the address bar of Opera Mini and click "Go".
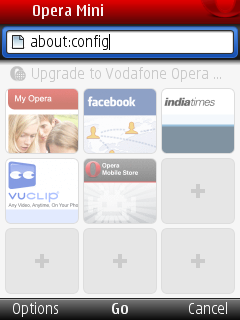
Opera Mini - Address to open configuration page
This will open a configuration menu as shown in the screen shot below. Here we will be able to change lot of settings like feedindex, linklists folding etc. In ths menu there will be an entry called "Use bitmap fonts for complex scripts". By default this setting will be disabled. Now change the setting to Yes and click Save.
Scroll down to find the option "Use bitmap fonts for complex scripts"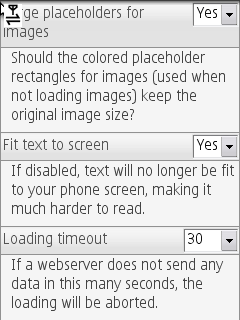
Opera Mini config Initial Page
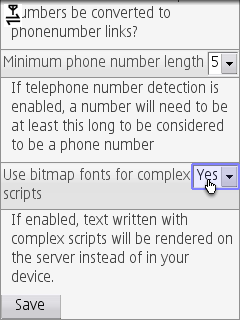
Change setting to Yes
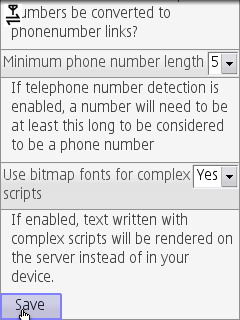
Click Save button to save the settings
What exactly happens ?
Usually while processing a web page for mobile phones in opera mini servers, text will be sent as normal text and font information. So the actual rendering of the font happens in the mobile. This method causes comparatively less bandwidth. After the change in the setting, Opera Mini server will render the text at server itself, then convert it to bitmap images and then send to phone. So the phone will display correct text.
This method works for other languages other than Malayalam also.So have good time reading an article in your local language using mobile while you are on move.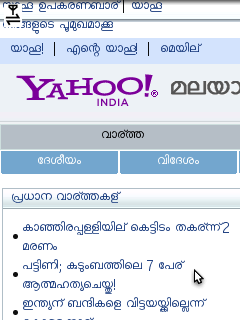
Opera Mini - Yahoo Malayalam page after setting
Note: Enabling this option will result in higher data rate. For example, yahoo Malayalam site size is 91KB with setting and it was only 28KB before enabling the setting.
If you are upgrading Opera mini to a higher version, then this setting has to be done again.
TATA DOCOMO 2G + 3G Modem = Cheap n good internet connection
I lives in Pune, India and in my area(Yerwada) there is no wired broadband connections available. (a local provider ICC Internet was available before with pathetic service, but they stoped service in this area) After waiting for long time(in years) I came to know that a service provider called Tikona has started their services which is available in my locality also. So I took the connection, but still condition is very bad. The signal strength will not be good most of the time and since they use shared bandwidth, the connection will be very very slow during peak time.
Recently after releasing of 3g modem I took a BSNL modem. Again there is problem. Signal strengh is not very good here so speed is not up to the mark(almost equivalent to 2G). Also the 3G data charges are very high. This time I came to know about TATA DOCOMO, so I thought to give it a try. This time was lucky, not because I got a broadband connection but because the 2G data charges. They have the cheapest 2G data charges(I guess). Listed below is some of the data recharges from TATA DOCOMO web site.
TATA DOCOMO 2G(GPRS) data plans
Now I got an idea. Use Tikona to download big files with good speeds during the off peak hours and use TATA DOCOMO for general during the peak hours. Still there is one problem with TATA DOCOMO GPRS. It is also slow during peak hours. But this limitation can be removed by using a 3G modem and connect using a 3G network. In this case we will be having a 3G connection, but the operator will be capping the bandwidth speed to that of 2G. Still we will be able to use internet at full 2G speed which will be enough for general browsing, blogging, checking mail etc.
Unlock BSNL 3G Modem, Use BSNL 3G Modem with other service providers
BSNL 3G modem (teracom lw272/lw273)comes with software lock. ie their is a setting which tells the software not to allow any SIM other than that BSNL. This setting is nothing but a registery entry with respect to the software. This setting is available at the registery location "HKEY_LOCAL_MACHINE\SOFTWARE\Linktop3G" with the name "Engineer". By default, after installation, the value of this registry variable will be 1. With this value, software will not allow any SIM other than BSNL. Inorder to use other 3G service providers, change the value of the variable "Engineer" to 0.
This will enable the software to accept SIM from other providers. Now for connecting to other service providers like IDEA, AIRTEL, AIRCEL, Tata DOCOMO, Vodafone etc, insert the sim, add the apn for the respective provider and click connect.
1) Copy paste the below listed lines on notepad and save as "UnlockBSNL.reg" and then double click. Select yes if windows asks for permission to edit/modify registery entry.
Windows Registry Editor Version 5.00
[HKEY_LOCAL_MACHINE\SOFTWARE\Linktop3G]
"Version"="V1"
@=""
"Engineer"=dword:00000000
OR
Download "UnlockBSNL.reg" and then double click to change the setting.
1) Registery window showing the updated setting
2) Settings>Connection window in the software, where APN for TATA DOCOMO is added and set as default connection for connecting to internet
Make Cheap PIC programmer than buy costlier one from market
You can find a lot articles and projects using 16F84 in the internet.
Programmer Hardware
Similarly JDM programmer can be used for burning the code as well as data on to the chip. It is very small and simple circuit, it does not even need a power supply and can be constructed on a common board. I also supports a large number of PIC micro controllers and other devices like I2C EEPROM, flash card etc. The image shown below is a snap of the JDM Programmer I constructed on a common board.
Programmer Software JDM Programmer constructed on common board
The best programmer for JDM is ICPROG but in Windows you need to set the I/O as Windows API and install the driver. It may cause some problems and you may get the device write failed. In this case you can use Pony Prog Programmer.


